Configuration of event ticket, registration confirmation & name cards
With the event module of the eworx Marketing Suite, you can create personalised event tickets, registration confirmations and name cards in just a few steps.
How can I define the layout?
In the events module of the eworx Marketing Suite, you have the option of creating your own event layouts. When creating a new layout, a name and the format must be chosen.
Optionally, a description can also be selected.
The layout can then be defined. Here you can determine how the event tickets, registration confirmation and name cards are displayed.
Not only can you select the desired colors or fonts, but also store an image (e.g. logo).
How do I create an event ticket including QR code?
First, an event must be created. You can find detailed instructions in the following whitepaper.
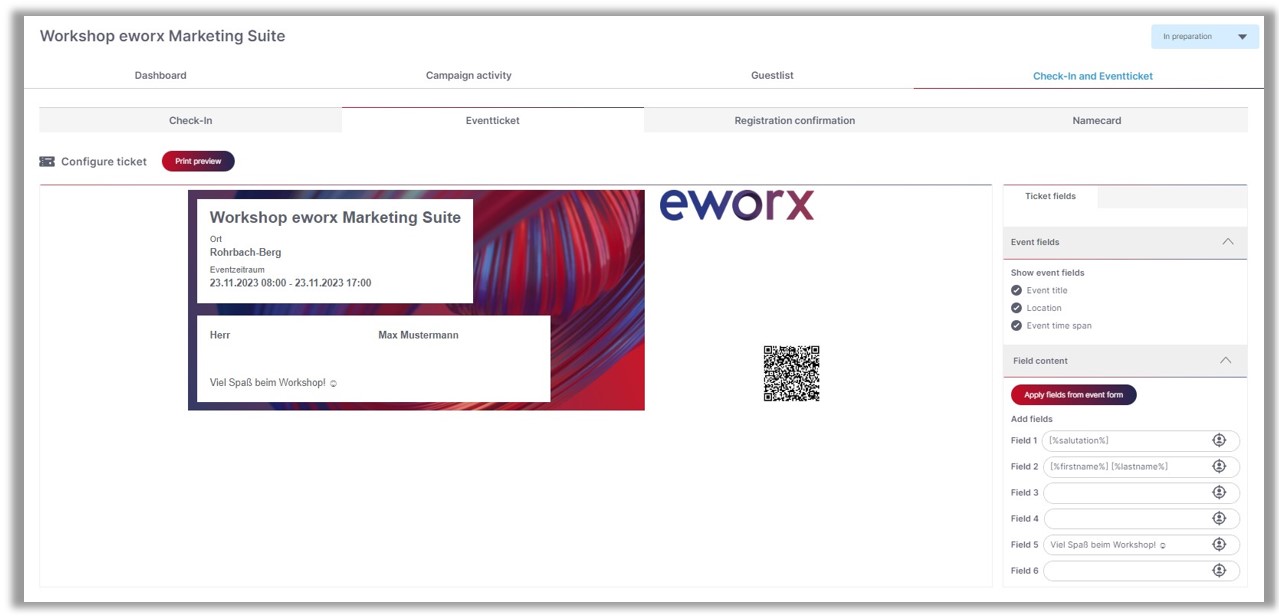
After creating the event, you can configure the pdf ticket with QR code under „Check-In and Event Ticket“ in the „Event Ticket“ tab. The QR code is generated automatically.
You can also hide and show the „Event fields“ (event name, location, and time period). In the „Field contents“ you can select which fields are to be displayed in the event ticket.

To send your guests the ticket including QR code by e-mail, you must first create an e‑mail campaign.
In the print preview, you have the option to print the ticket for all or only for individual recipients. You can test the personalization using the personalization bar.
You also have the option of copying the link to the event ticket in the top right-hand corner in order to send it via an external medium if necessary. Make sure that the ticket is personalized to the correct recipient.
For easier check-in at registration, you should inform the guest to bring the ticket (printed or digital) to the event.
Tip: To check the registration process from the recipient’s point of view, we recommend carrying out the registration on a test basis. In the preview of your campaign, you can check the contents of the ticket.
Is there a possibility to configure a registration confirmation?
The registration confirmation can be configured under „Check-In and Event Ticket“ > „Registration Confirmation“. Here you can select which fields are to be displayed on the registration confirmation.
You also have the option of opening and printing the registration confirmation in the print preview. You can print the registration confirmation for individual recipients or for all recipients who have registered for the event.
Besides de possibility of printing the registration, you can send the registration (automatically) per Mail.

For example, the recipient receives a registration confirmation by e-mail after submitting the registration form, an event-dependent e-mail campaign must be created.
For this purpose, the campaign must contain the event link ‚Registration confirmation‘ so that the guest can download the registration confirmation and print it out if necessary. A description of how to create a link in the email campaign can be found in the following whitepaper.
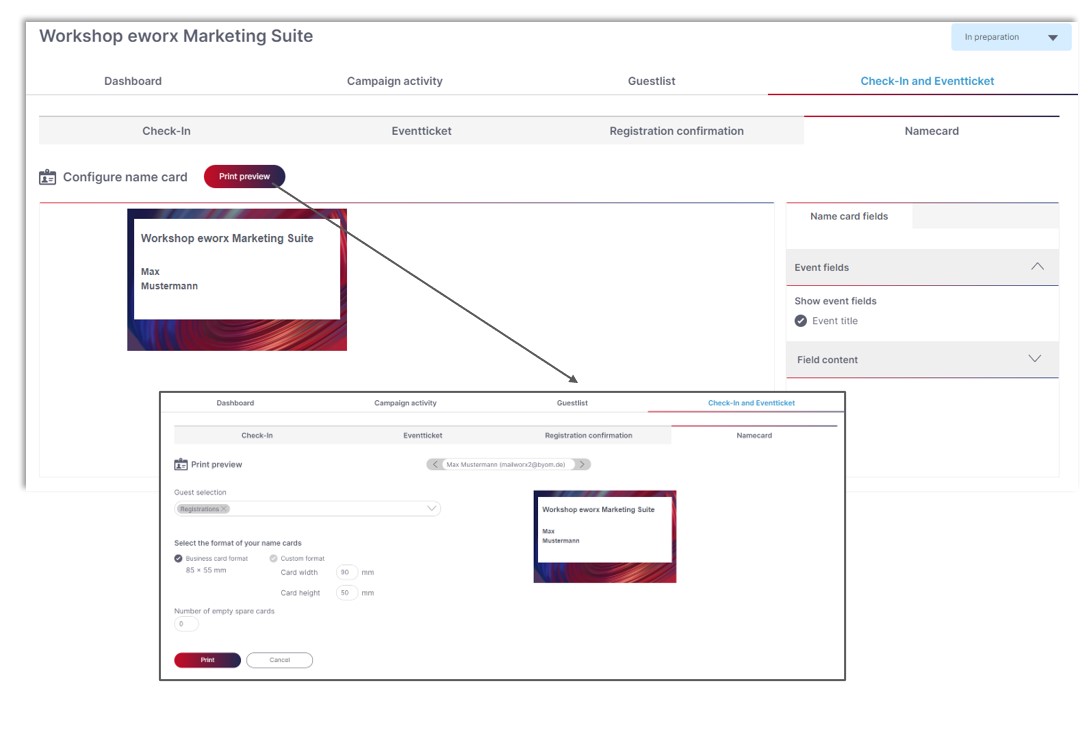
How can I create name cards for the event?
Under „Check-In and Event Ticket“ > „Name Cards“ you can create and print out name cards for your guests in just a few steps.
In the „Preview“ you can determine the „Selection of persons“. You can select from the registered persons, recipients who are on the waiting list or those who have not responded.
You also have the option of selecting the format for your name cards. You can choose between the „Business Card Format“ (85 x 55 mm) and an individual format, where you can change the size of the name cards in height and width.
You can also enter the number of empty reserve cards for which you will insert the name manually later. The layout of the cards (colour, logo,…) is determined by the configured event layout.