Successful communication – before & after the event
The fully integrated eventmanagement feature of the eworx Marketing Suite provides every step to plan communication before and after an event. Additionally, you can automate registration as well as guest list management.
In this whitepaper you get to know step by step how to use the events app within the eworx Marketing Suite.
What do I have to consider when creating an event?
In case the event app is activated for you, you will find it in the main menu of the eworx Marketing Suite under ‘events’. By clicking the button ‘New’ you have the opportunity to ‘Create new event’, ‘Create new event with assistant’ or ‘Create event based on existing event’.
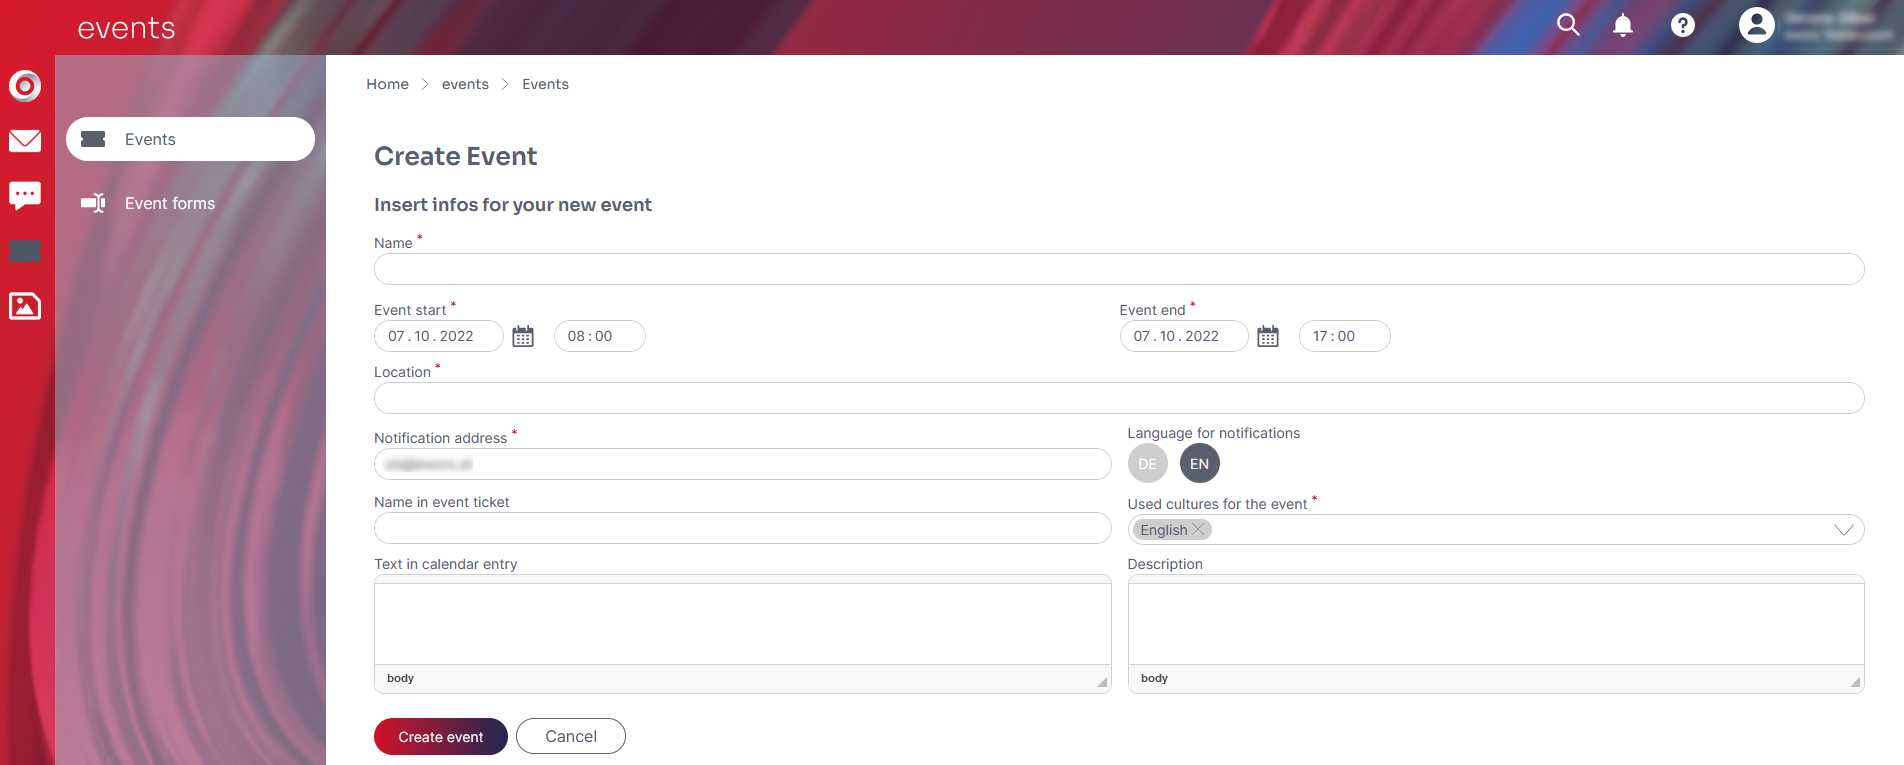
When creating a new event you first have to fill out the information for your event. In the field ‘Notifcation address’ you an define an email address that will be informed if there would be any problems with sending the campaign (e.g. overriding the send limits or empty event groups).
The field ‘Description’ is for internal notes.
You also can define a ‘Text in calendar entry’, the information given will be set automatically for the link type ‘Calendar entry for event’ which you can use in your email campaign in the ‘Add link’ window.
Also choose the ‘Used cultures for the event’. Multiple selection is also possible in order to match different campaigns with different languages to an event. In the case of multilingual events we recommend to create an international subscription form in English. You can also edit these settings by clicking the ‘Edit’ button in the information of your event.
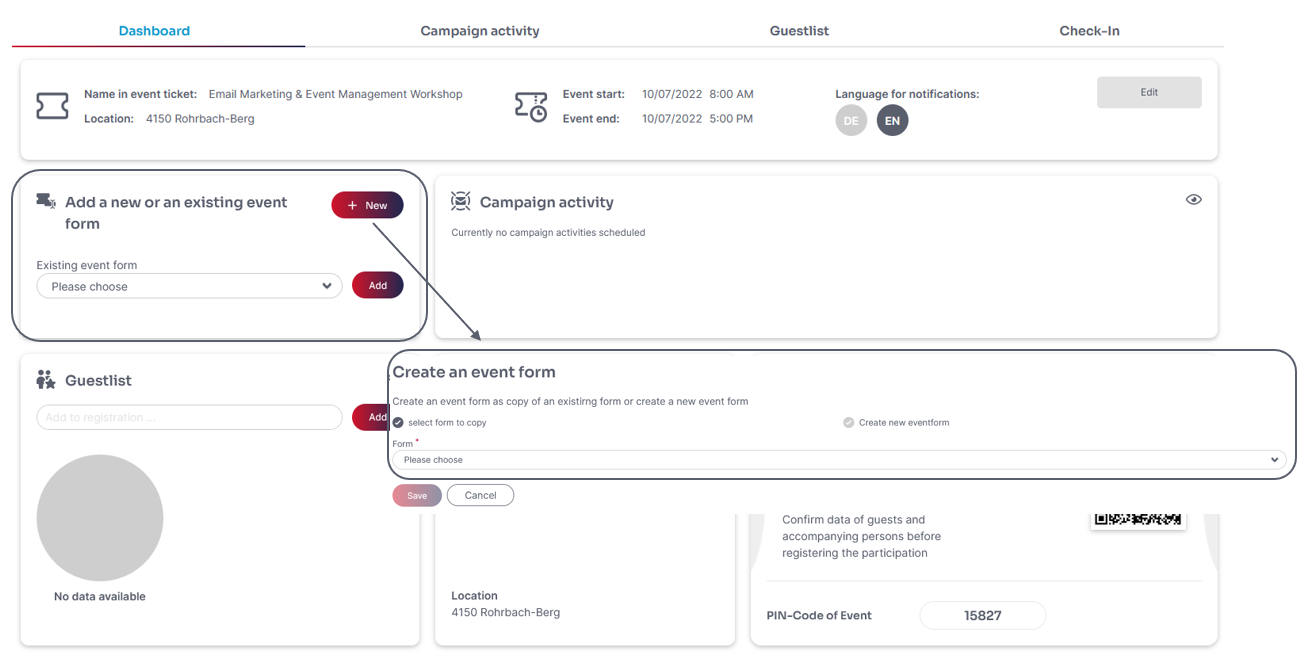
Right after creating the event you get an overview on the event dashboard where you can see all information about your event on top of the dashboard. It also provides a tile for the ‘Event forms’, the ‘campaign activities’ that are planned for the event, a pie chart with the ‘Guestlist’, the ‘Calendar entry’ which shows the text and can be changed into a Microsoft Teams meeting, as well as the ‘Check-in’ with QR-code
All details to the single tiles are given in the following.
How do I create an event form?
On the event dashboard you are able to choose a existing form for your event or create a new one. When creating a new form you can decide if the form should be a completely new one or a copy of an existing one. After saving the settings there will be more tabs and opportunities in order to edit the form.
You also have the possibility to manage your event forms or create a new one under ‘Events’ > ‘Event forms’.
Which adjustments are possible in the tab ‘Settings’?
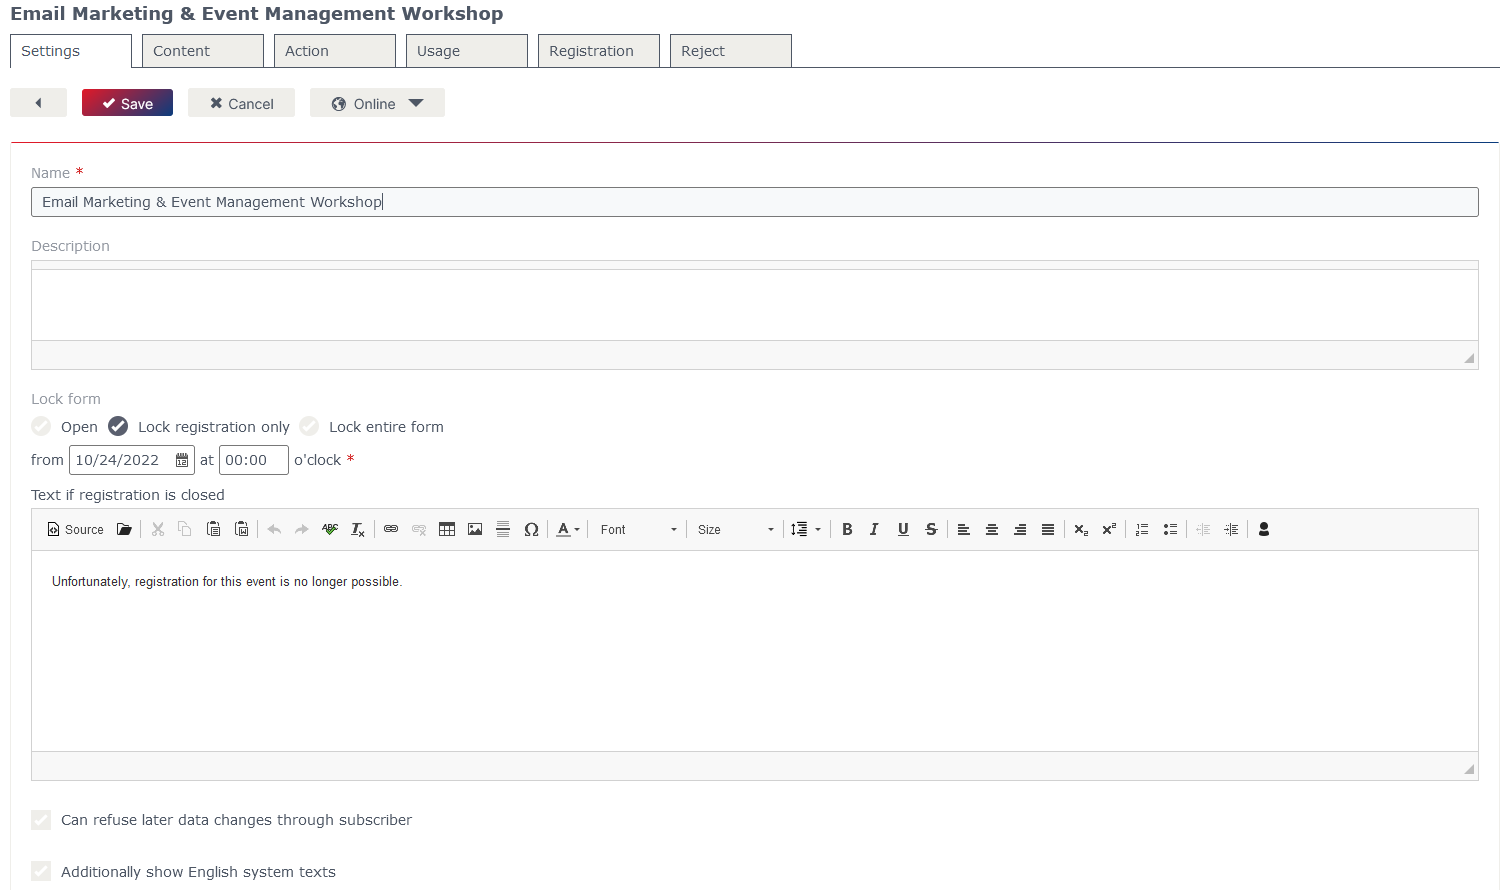
In the first tab ‘Settings’ you can define the internal name for your event. You can also set internal notes in the field ‘Description’. As if you may know from the regular forms within the eworx Marketing Suite, you can close a form from a certain date on. You can now define a text that will be shown if someone would like to invoke the form from the deactivation date on. Additionally, you have the possibility to only close the subscription instead of the whole form for event forms. You can also define if you want to refuse changing subscriber data subsequently and if you want English system texts to be shown.
Which adjustments are possible in the tab ‘Content’?
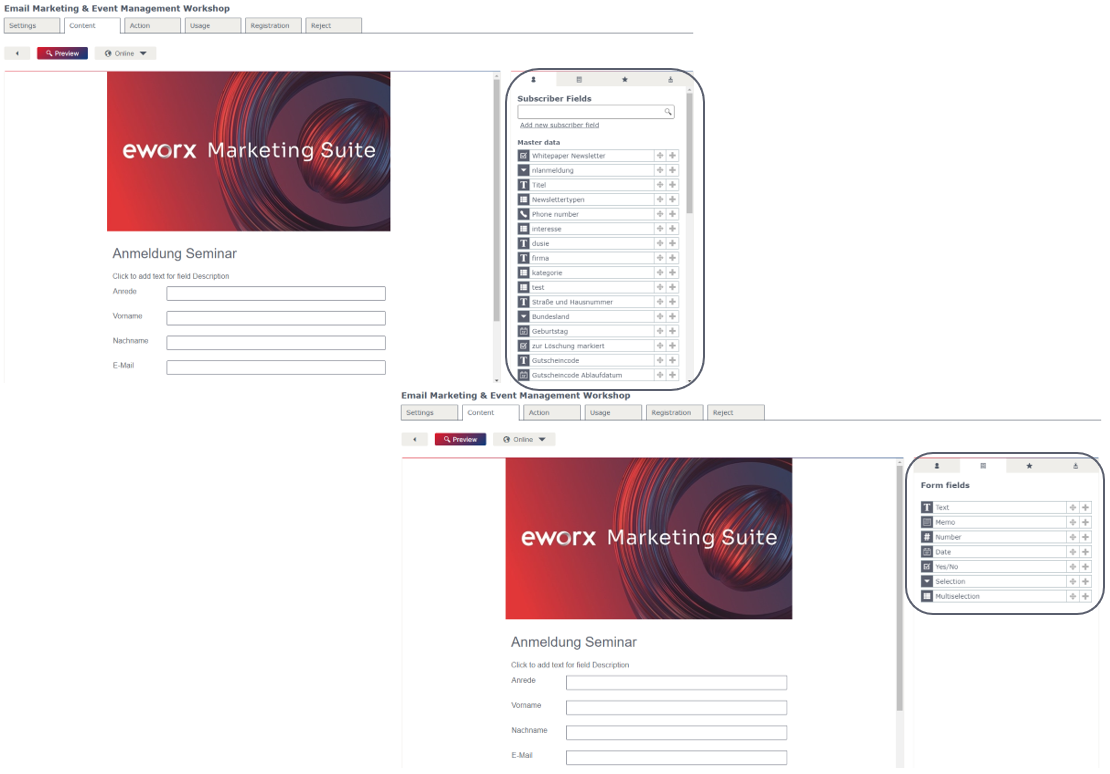
The tab ‘Content’ also offers additionally ‘Form fields’ which are not saved on the subscriber data but only on the form for a better overview – you can also export them.
Use ‘Subscriber Fields’ for data that already exist (like ‘surname’ or ‘email’) or that you want to collect for further usage (e.g. ‘company’).
For information that should be collected for the event only (e.g. lectures or menu selection) you can easily create a ‘Form field’.
For a detailed description on how to match the form to your needs, read here.
Which adjustments are possible in the tab ‘Action’?
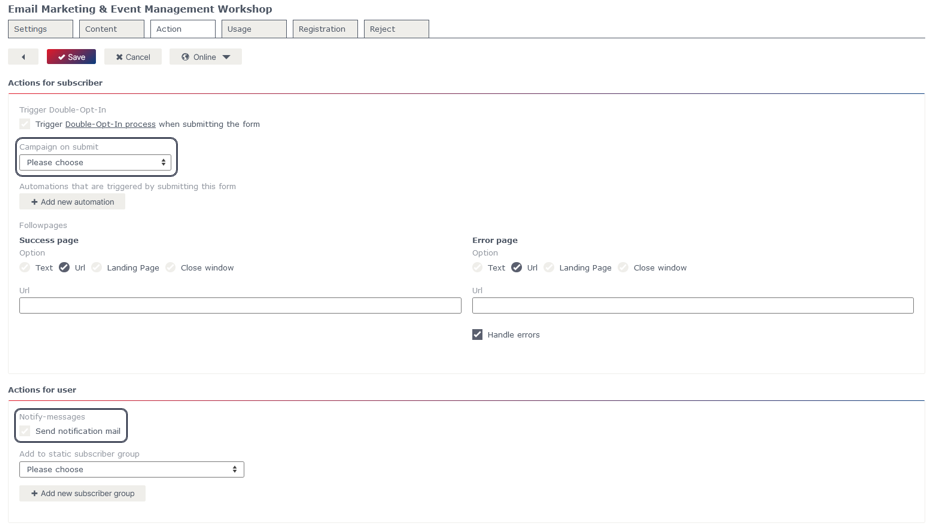
In the tab ‘Action’ you can choose an event-based campaign that should be used as confirmation mail for the subscription.
You can also define who be notified in case of a new subscription. If the contingent of your event runs full and you activated the waiting list function (see below) the notification contains the reference to the waiting list.
Further information on which settings can be defined for ‘Action’ of the form can be found here.
Which adjustments are possible in the tab ‘Usage’?
What do I have to consider when it comes to subscriber matching?
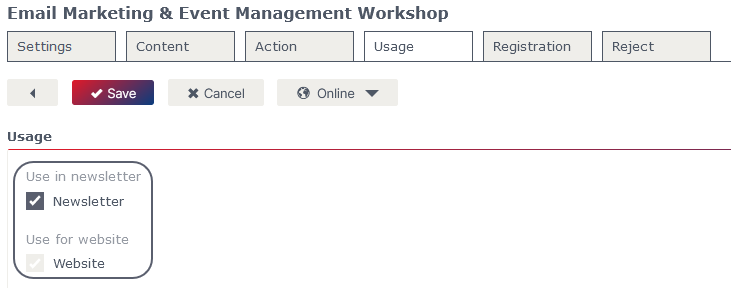
When it comes to ‘Data matching’ (tab ‘Usage’ – bottom of the site) the option ‘Update existing subscribers’ is recommended for events in order to avoid overwriting the subscriber’s data if another than the initial newsletter subscriber registers for the event.

Which adjustments are possible in the tab ‘Registration?
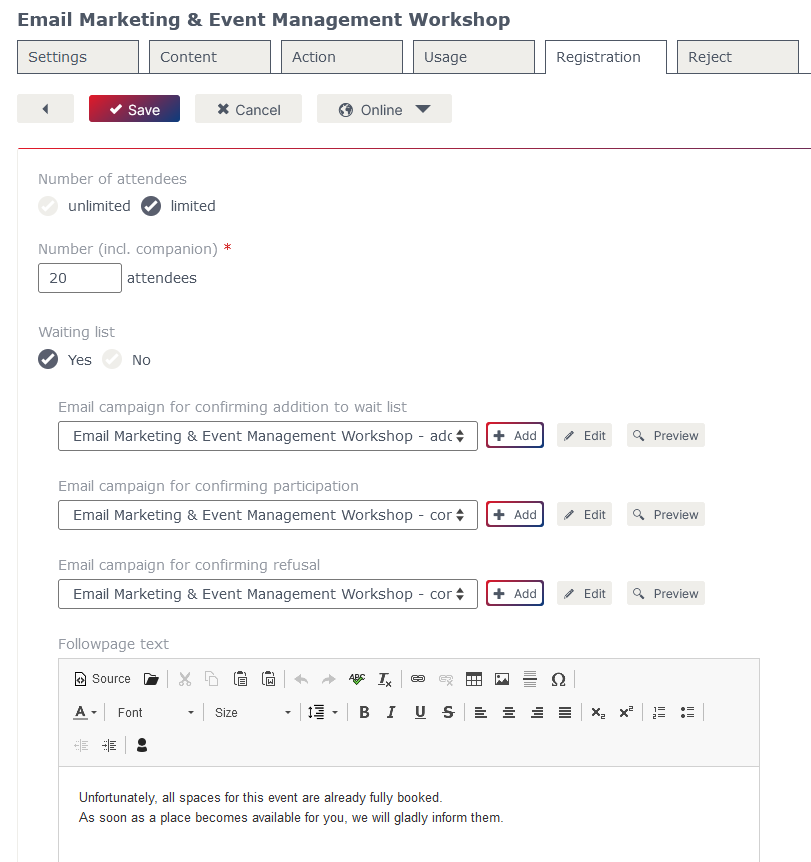
Here you can adjust all settings for the registration process. If your number of attendeesis limited you can define the maximum of guests as well as number of companions allowed.
Can I integrate a waiting list?
You also have the possibility to decide whether participants, that can not come due to limited space, should get a cancellation or if you want to add them to the waiting list.
If you are using a waiting list you can automate the process using event-based campaigns in order to inform your interested parties about their status. Thereby the subscribers will be informed when they were added to the waiting list or when the guest will set manually via the guest list to Subscriptions or Cancellations.
If you don’t want to work with waiting lists you can define a text that will be shown instead of the subscription form when the event is fully booked.
What do I have to adjust if participants would like to come with companions?
You can decide whether you want to allow companions and if yes, how many companions a guest can bring. Therefore you can add a description for a form field in order to ask for important information (e.g. name of the companion). Afterwards you have the possibility to integrate that form field into your form in the tab ‘Content’ under ‘Extras’. You can decide where to place the form field.

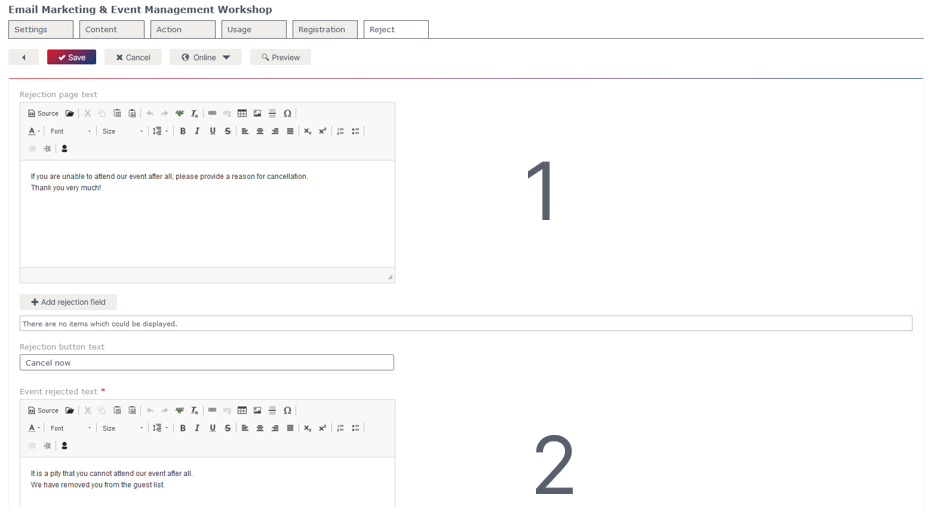
Which adjustments are possible in the tab ‘Reject’?
Especially when the number of participants is limited it makes sense to offer the opportunity to cancel the participation if a guest is not able to attend. Places will be free for guests on the waiting list.
- You can optionally define the text shown if subscribers click the ‘Cancel’ link in a campaign (this link type does not have to be used). You can also gather further information like reason of cancellation or if the subscriber wants to get some info material on the event.
How to integrate the cancellation link into a campaign can be read below. - In the second field you define the text for confirming the cancellation. This field is mandatory because if a subscriber already registered for the event he gets that information as well as the possibility to cancel his subscription when clicking on the registration link again.
The preview shows you how the ‘text of cancellation page’ will look like.
Which event links can I add to my campaign?
When creating an email campaign for your event (e.g. invitation or reminder) you can choose from different event links and link functions:
- Registration confirmation
Clicking the link will open the confirmation as a pdf file. - Event rejection
Linking to a cancellation site on that you can ask for the reason e.g. - Event registration
Linking to the subscription form of the event. - Calendar entry for event
Generating a calendar date from the event information that can be downloaded and saved in Outlook. - Event ticket
Clicking the link opens a personalized ticket with QR code as pdf file. - Simple subscription/unsubscription (additional link function)
You can e.g. link to a landing page and define under ‘additional settings’ if the link click should be registered as attendance to an event.

How can I create an online event with link?
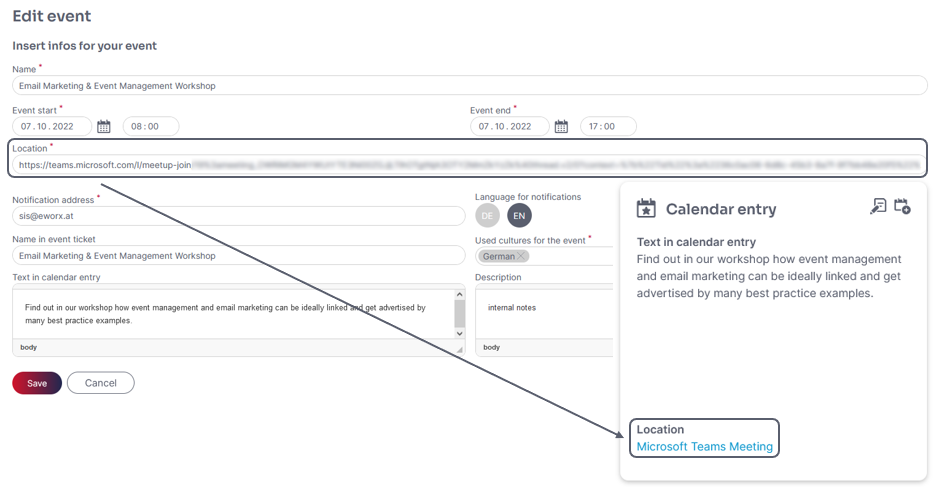
If your event is an online event you can add a link to your meeting tool (Google Meet, Zoom, Webex, Skype, MS Teams) in the ‘calendar entry’ as event location.
When adding the link type ‘event date’ to a campaign the system recognizes automatically that it is an online event and the location will be changed into a link to the online meeting. The system also adds start as well as end date and the event description to the calendar entry automatically.
Which information do my subscribers/guests get
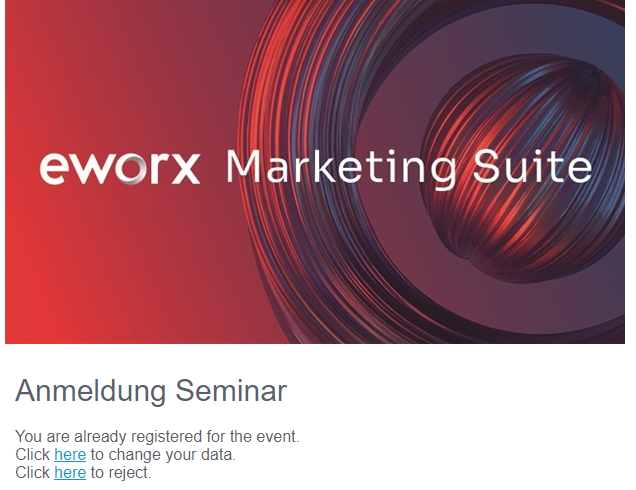
- In case of a subscription, cancellation or waiting list number your subscriber gets recent status information when clicking one of the first three event link types and gets the possibility to change his dates or the number of companions.
- If the subscriber already registered he also gets the chance to cancel the attendance.
- In case of a cancellation the subscriber can subscribe again when clicking the link to the registration form again.
How do I plan campaign activities in advance?
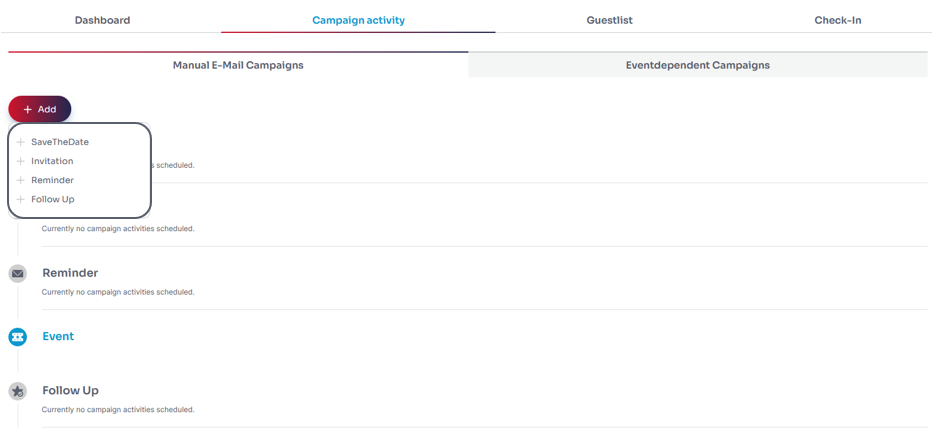
In the tab ‘Campaign activity’ we differentiate between manual and event-based email campaigns.The tab with the manual email campaigns offers a time line for a perfect overview over all communication measures of the event.One of the big advantages of events is the possibility of planning campaigns in advance. With clicking the button ‘Add’ you can add a new campaign activity. You can choose from ‘SaveTheDate’, ‘Invitation’, ‘Reminder’ and ‘Follow Up’. You can also add various campaigns to every communication step. After choosing your campaign activity you can decide whether you want to add campaigns that already have been sent or send a new campaign. You can – as you may know from the campaign editor – plan your sending for a specific time or send the campaign directly. You can not only use target groups as subscribers but also automatically generated groups. That groups are generated automatically due to their subscription status to the planned sending time.
Here you can find an overview over the groups that can be chosen for different campaign activities:
Invitation
- Event group ‘Invited subscribers without reaction’
Reminder
- Event group ‘Invited subscribers without reaction’
- Event group ‘Subscriptions’
Follow up
- Event group ‘Subscriptions’
- Event group ‘Invited subscribers’
- Event group ‘Attendees’ (actually present)
In the tab ‘event-based email campaigns’ you find those campaigns that were defined as ‘campaign when sending the form’ for the event form, the campaigns for the waiting list as well as campaigns defined for the attendance.
Am I able to deposit the companions’ personalized data in the campaign?
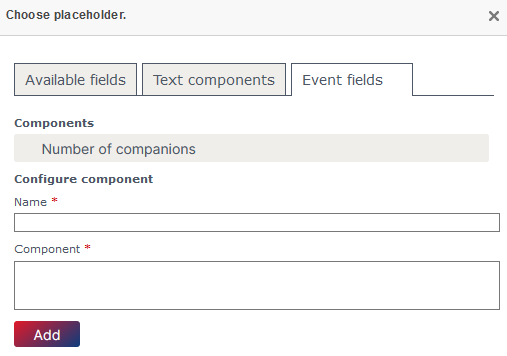
If you already linked a campaign to the campaign activities you can add the companions’ data to the campaign. You only have to edit the campaign. When clicking into a text field the toolbar appears which contains a symbol of a person. The linked campaign contains a new tab (Event fields) in the personalization pop up which allows you to add companion fields as well as companion number to the campaign.
In this pop up you can also add or delete components. The component ‘Number of companions’ is available per default.
After adding the personalization element you wish for in the campaign editor you can test the personalization by changing into preview mode.
How am I able to look up the registration status of the guest list?
In the tab ‘guest list’ you can see the status of your invited subscribers as a list that you can export or add to static subscriber groups.
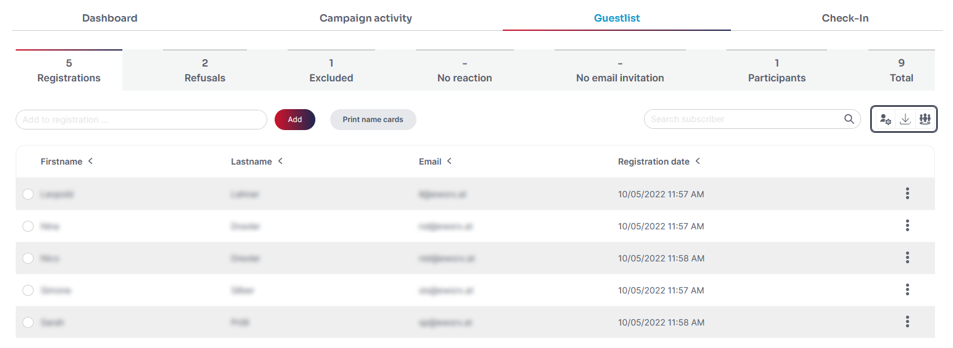
By choosing one or more subscribers more buttons appear that allow different actions. Depending on the tab you are in you can confirm the participation of a subscriber,to register a refusal, confirm or note the participation. You can find these actions also under the three dots on the right-hand side of the respective subscriber.

Am I able to make manually modify the guest list?
You can add subscribers to your guest list if the subscriber already exists in your client. You can also edit the registration data of subscribers that are already on your guest list. This also allows you to add companions to an attendee. Please be aware that editing the subscription data also effects the subscriber data if you used subscriber fields for registration.
Note: Changing the subscription data will automatically send the campaign that you defined as ‘Campaign when sending the form’.
In the dot menu you can also forward a campaign if the campaign is linked to the tab ‘campaign activities’.
Configuration of event ticket, registration confirmation & name cards
In the events module of the eworx Marketing Suite, you have the option of creating your own event layouts. When creating a new layout, a name and the format must be chosen.
Optionally, a description can also be selected.
The layout can then be defined. Here you can determine how the event tickets, registration confirmation and name cards are displayed.
Not only can you select the desired colors or fonts, but also store an image (e.g. logo).
You can find furhter information here.
What do I have to prepare for a stress-free check-in?
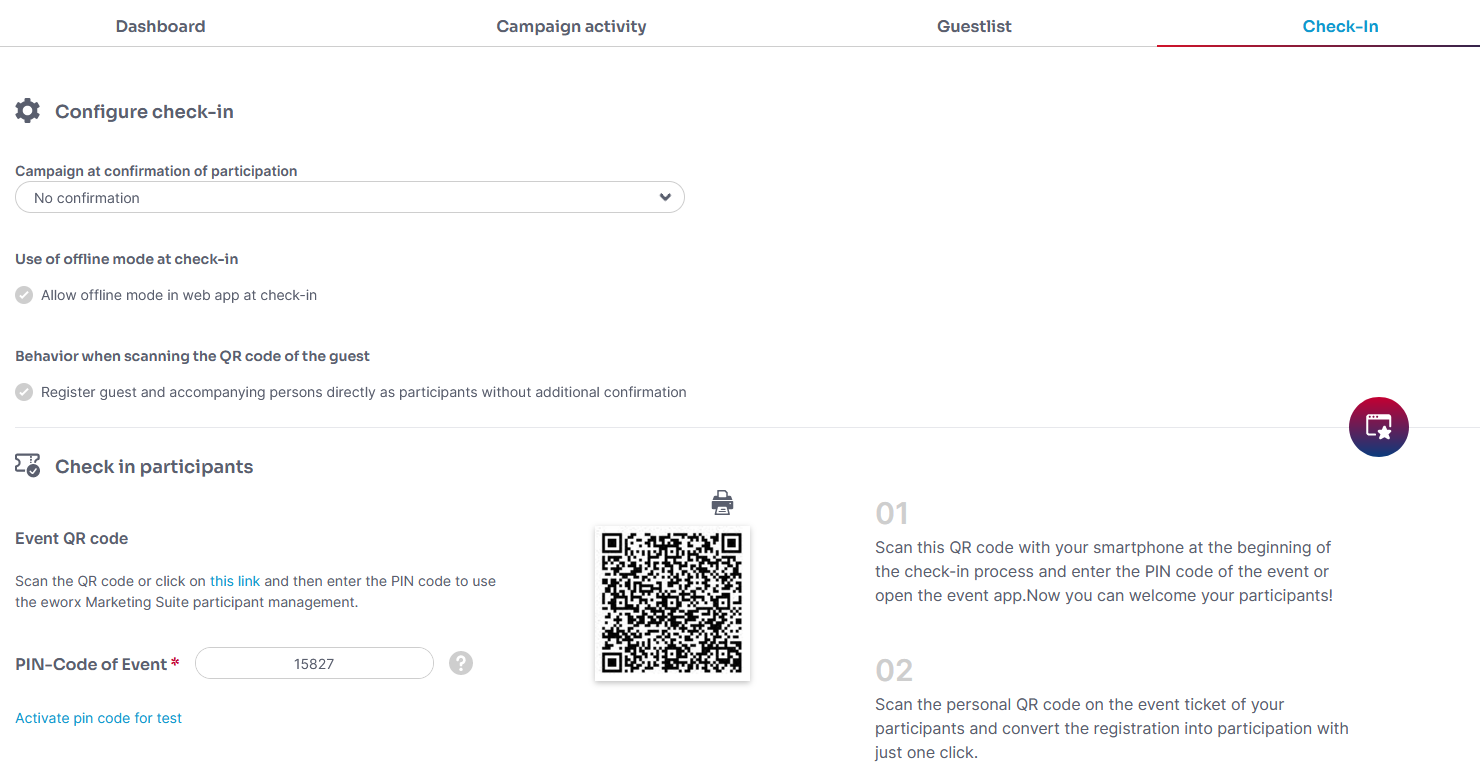
In order to scan the QR-code of your guests on the event day via smartphone or tablet you need a QR-code reader on your device. The online event app will open by scanning the QR-code in the tab ‘Check-in’ of the respective event or by clicking the button ‘Event app’. Entry is locked by a pin code that can be found in the tab ‘Check-in’ which can also be edited. It is also possible to temporary activate the pin code for testing issues. Otherwise the pin code is valid during the event as well as 6 hours before and after the event.
In the tab ‘Check-in’ you can add a campaign that will be sent automatically for confirming the attendance. This will inform your subscribers about changes or general information about the event.
Which opportunities do I have with the event app?
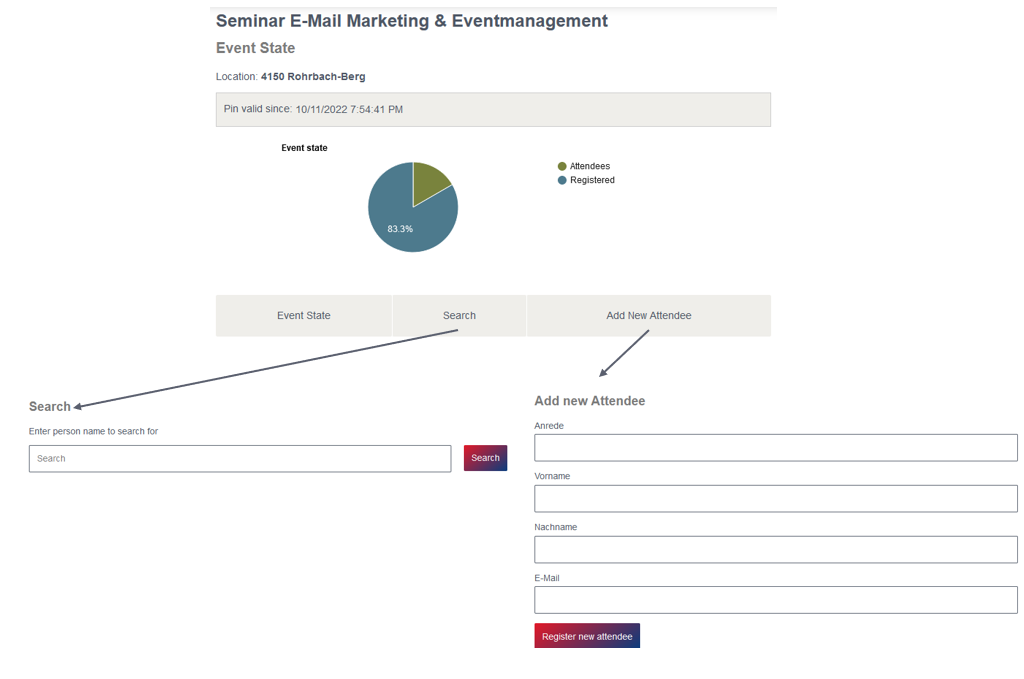
Opening the event app – that does not have to be downloaded from the app store – will show the status of the event as well as name and location. Here you find a pie chart for a perfect overview over your attendees.
You have the possibility to note if a subscriber actually attended the event:
- Scanning the QR-code ticket
Scan the QR-code and change a subscription into a attendance with just one click. If companions are allowed you can register both, guest and companion, as attendees. If a guest comes without companion you can also check him in without his companion. - Choosing from the guest list
Almost as fast as checking in with the QR-code you can find your guests by searching him in the event app. When a guest forgot the ticket he can be registered from the guest list. - Add a new guest
If a guest comes without registration you can add him to the guest list afterwards.
